WHAT’S NEW?
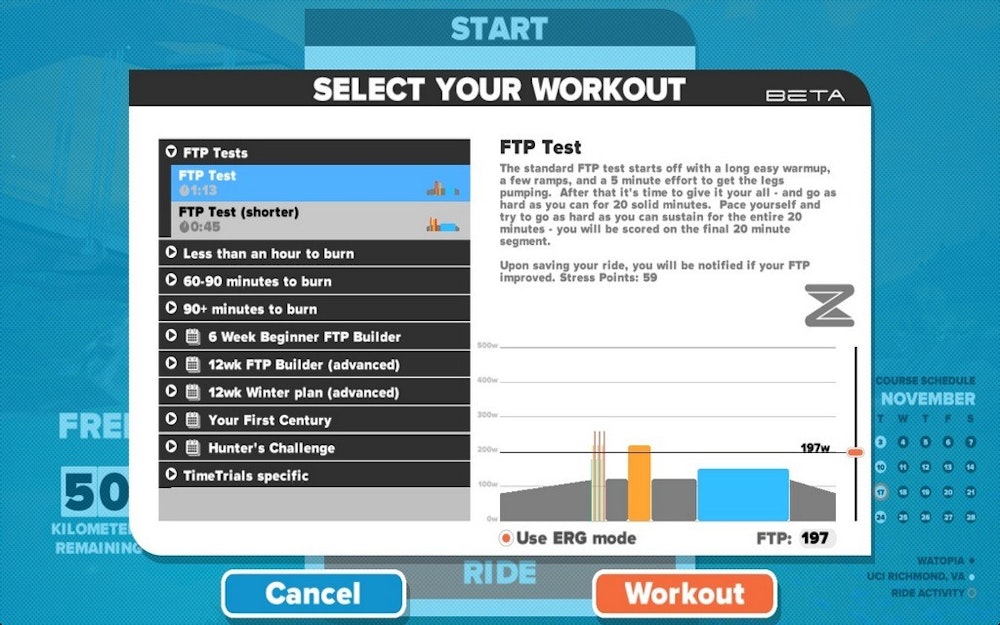
Zwift’s workouts are structured training sessions that allow users to be more targeted with their training, rather than simply rolling around whatever virtual course is available on the day. There are dozens of workouts of different lengths and intensities that come bundled with the Zwift software — everything from intense half-hour workouts, to time-trial-specific efforts, through to 12-week-long training plans that will get you through winter or help you increase your functional threshold power (FTP).
Each workout has a description beside it so you know ahead of time what sort of punishment you’re in for.
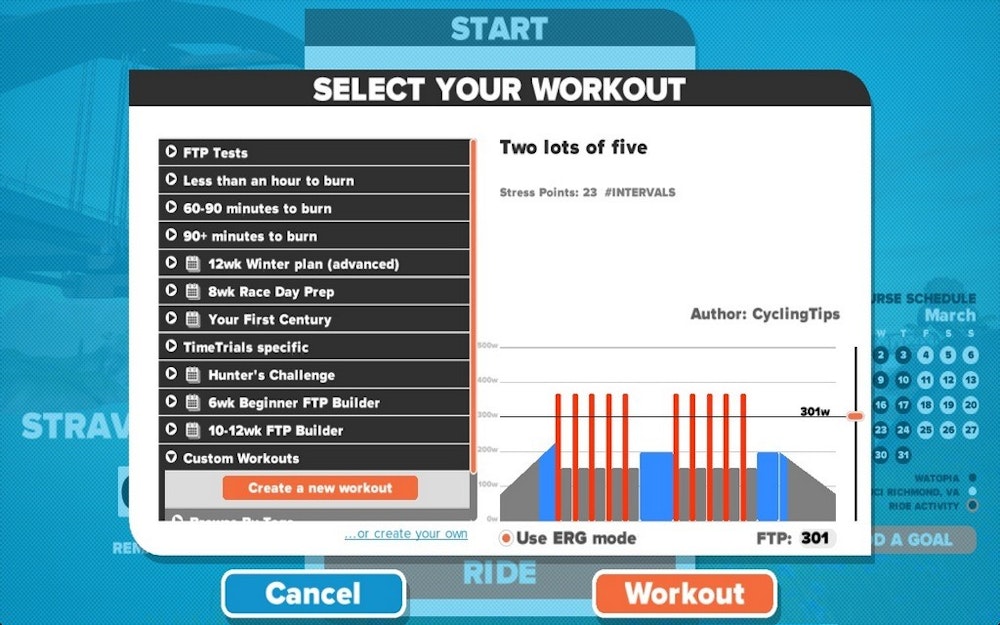
Finding and choosing a workout is easy. Simply start the Zwift software, connect any relevant sensors or trainers (see our original review for more info), click “Select Workout” from the main menu, then make your choice. Each workout has a variable FTP slider which allows you to customise the experience based on your capabilities. Don’t know your FTP? There’s a workout for that.
Once you’ve selected your workout, simply start your ride and the workout will begin right away.
DOING A WORKOUT
As with Zwift generally, you’ll get the most out of the workouts if you’ve got a smart trainer — a stationary trainer that can measure your power output and that automatically adjust the resistance you’ll be pushing against. When you’re riding around Zwift’s courses normally, these resistance changes occur as the gradient of the virtual course changes. With workouts, the resistance changes as you hit each section of the workout.
This is as you’d expect, but there’s a downside. When you’re doing a workout you’re still rolling around one of Zwift’s virtual courses with all its climbs and descents. When you’ve spent some time with Zwift and you’re used to feeling the resistance increase as the virtual road ramps up in front of you, it’s strange for that not to happen when you’re doing a workout.
But you soon learn to ignore the terrain and just focus on hitting the numbers Zwift wants you to hit.
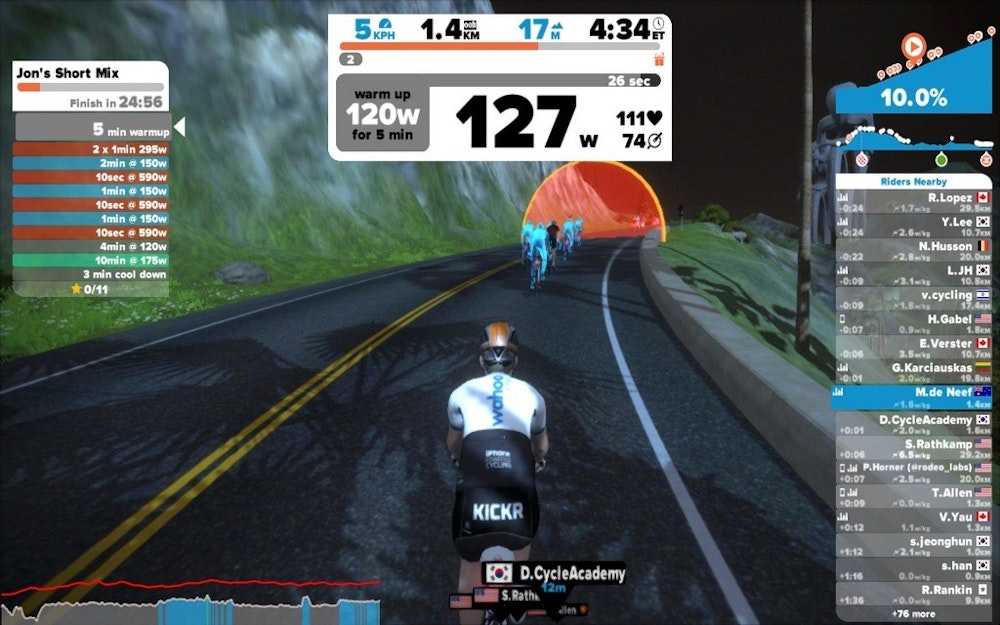
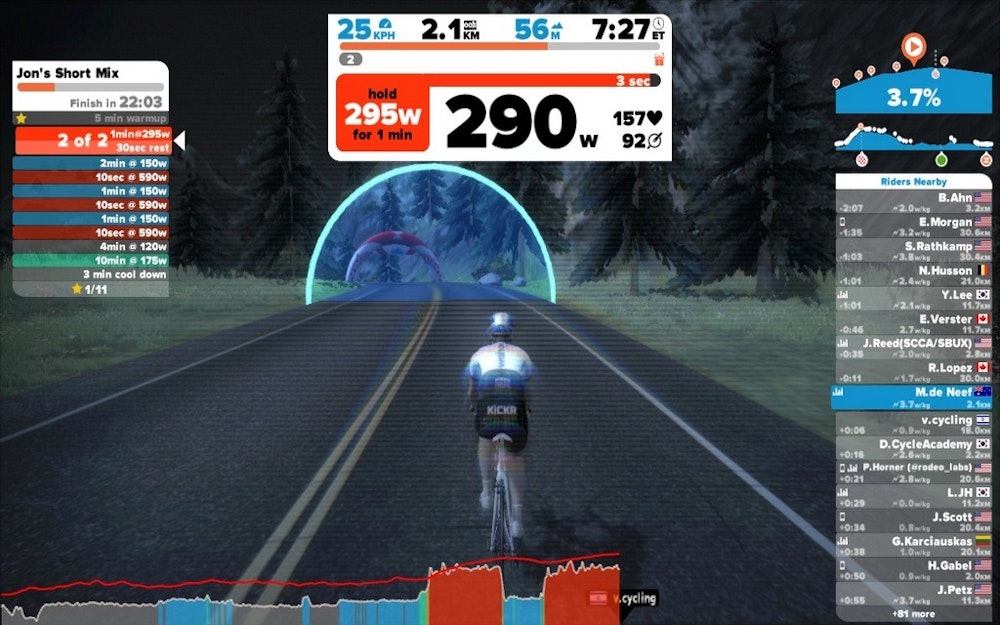
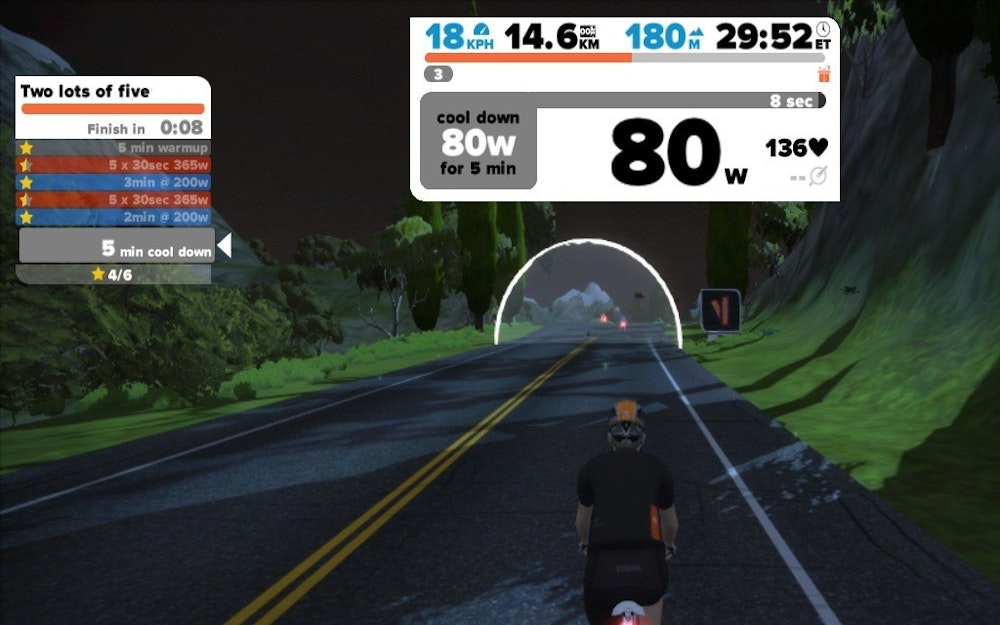
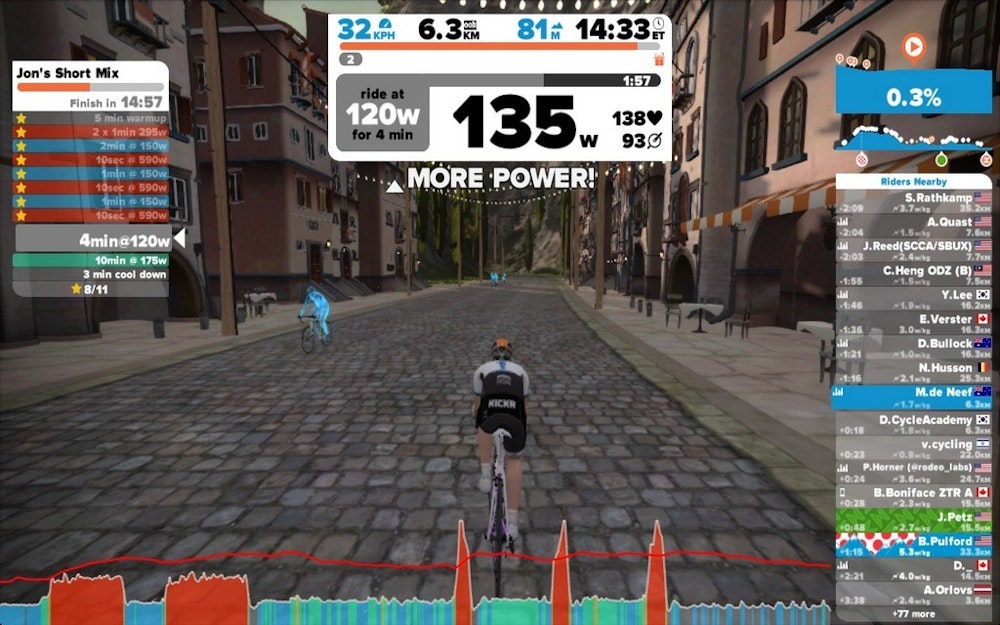
The start of each section of a workout is designated by a gantry on the road. Pass under that and a banner will show you what power you need to hold and how much longer you need to hold it for.
If you’re putting out too much or not enough power, the software will let you know, urging you to get closer to the target zone. A graph showing your heartrate and power output (with colour determined by power zone) is displayed at the bottom of the screen throughout. The structure of the workout is displayed on the left of the screen.
As each section of a workout comes to a close, you’ll see then pass under another gantry on the road.
One of the things that Zwift does very well is micro-rewards and this carries over to workouts as well. Maintain a power output close enough to the target zone and you’ll get a gold star for that section. Put in an inconsistent performance and you might get half a star. Flunk it entirely and you’ll remain starless for that section. The more stars you get, the more experience points you’ll get for the workout; experience points that count towards your Zwift level.
In some of the workouts I did I found it difficult to reach the target power quickly due to a delay in the resistance adjustment at the start of a section. I’d increase my cadence as the start gantry approached but with the lower resistance not kicking in for up to five seconds sometimes, it meant I was just spinning out at lower power than Zwift wanted me to be putting out. When doing short segments this meant I’d struggle to get a full gold star for that section.
(The team at Zwift told us this is an issue they’ve heard of before and one that’s likely caused by connectivity issues between trainer and computer. They recommend using a USB extension chord to get the ANT+ dongle as close to the trainer as possible).
When your workout ends the additional graphics will disappear from the screen and you’ll be back out on the virtual course, free to keep riding with the gradient-affected resistance changes back in effect. Or you can end your session right there and then.
It would have been nice to have some kind of summary screen pop-up, showing how the workout went and providing a sense of completion. As it is, finishing a workout feels like something of an anti-climax with little more than an audio cue or two to celebrate that you’ve finished.
CUSTOM WORKOUTS
In addition to the many workouts and training plans that come with Zwift, users also have the ability to create their own custom workouts. Simply scroll to the Custom Workouts section at the bottom of the workouts list, then click “Create a new workout”.
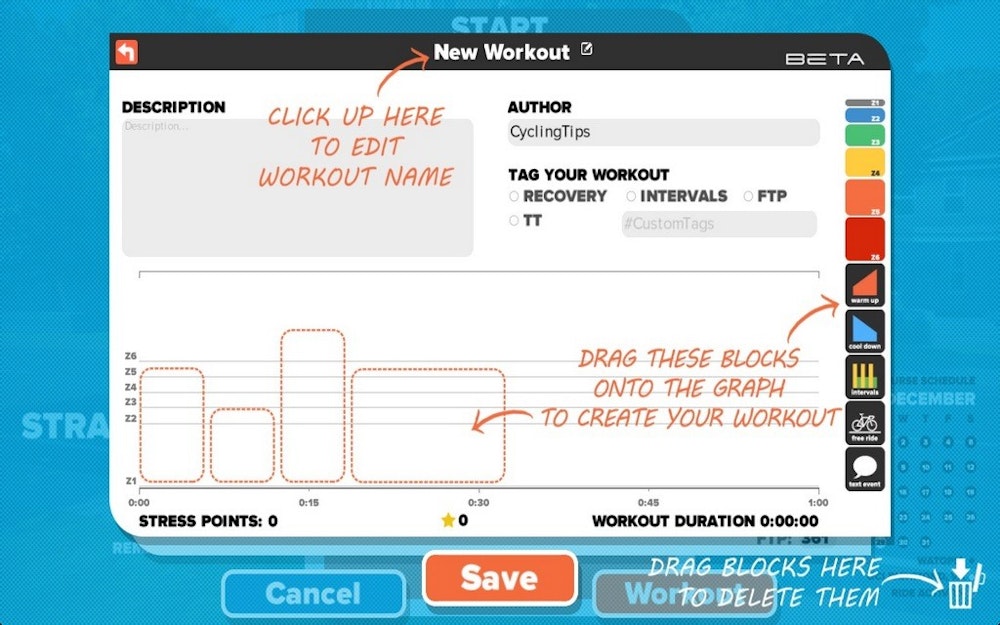
Building your workout from scratch is a breeze. There’s a handy on-screen tutorial (see image above) that shows you how to drag-and-drop blocks of various lengths and intensities to the workout. It takes literally a few minutes to create a workout from scratch and save it, ready for you to ride.
To test the Custom Workouts functionality I created a half-hour workout that featured: a five-minute warm-up; two sets of five, 30-seconds above-threshold efforts; a three-minute steady effort (between the two sets of efforts); a two-minute steady effort (towards the end); and then a warm-down.
After adjusting the FTP slider to suit my (lack of) ability, I was off and riding the workout I had just created.
The first set of efforts came up faster than I was expecting and hurt more than I would have liked. But overall the workout was challenging without being overly difficult. I suspect it would have been better to make the two sets of five efforts quite a bit harder, to simulate attacks in a race, for example.
My own shortcomings in workout design aside, I was impressed by the Custom Workouts tool. It was easy to create the workout I wanted to and satisfying to be out testing it in seconds.
THOUGHTS AND IMPRESSIONS
There’s no shortage of impressive tools out there for riders that find themselves on the stationary trainer and wanting to make best use of their time. All have their strengths and for Zwift it’s perhaps the fact that its workouts are just an add-on to an already impressive product.
As discussed previously, Zwift provides an appealing way of livening up the indoor trainer experience and Zwift workouts are just another string to the product’s bow.
If you’re already a Zwift user and you’d like to add some more structure to your virtual training rides, then there’s no reason you shouldn’t be using the workouts functionality already. Sure, you do lose some of the multiplayer appeal when you’re doing a workout — riding with other users, for example — but those features will always be there once your workout comes to an end. Plus, other users can see when you’re doing a workout (as indicated by a bar graph next to your username) and some tend to offer encouragement.
In some ways, it’s tempting to compare Zwift’s workouts with the training videos offered by The Sufferfest, as both offer visual distraction from the pain being inflicted on legs and lungs. In this comparison, The Sufferfest perhaps comes out on top with its inspiring video footage of pro racing, great tunes and, just as importantly, the cheeky and entertaining tone with which the content is delivered.
But the Zwift virtual world, while not as inspiring as watching the pros race, does provide its own flavour of visual distraction, something that other training systems — like TrainerRoad, for example — don’t really provide. And, again, Zwift’s Workouts form part of a bigger whole; an overall package that has value beyond its structured training plans.
The biggest downside to Zwift workouts — particularly for users that might have tried Zwift early on before shelving it during the warmer months — is that the software is now no longer free. A monthly subscription — introduced in November 2015 — will set you back US$10 (AU$14).
To me, the cost seems reasonable, particularly if you’re the sort of rider that does a fair percentage of your riding indoors, whether due to time constraints, adverse weather conditions or just because you love it (here’s looking at you, Shane Miller). A subscription to rival training products will cost about the same amount — a TrainerRoad subscription, for example, will set you back US$12 (AU$17) a month, or slightly less than that if you get an annual subscription. It’s also worth noting that the cost of a Zwift subscription is quite small in comparison to the cost of buying a compatible smart trainer like the Tacx Neo or Wahoo Kickr.
Zwift also offers a free 14-day trial to new users — perfect if you’re intrigued by the product but not yet ready to commit. Strava Premium users also get an additional two months free Zwift for linking the Zwift and Strava accounts.
IN CLOSING
As mentioned in our original review, there’s little doubt that Zwift livens up the indoor trainer experience, turning what can be a thoroughly dull experience into something that’s fun, motivating and that can be done as part of a thriving online community. The addition of Workouts to the Zwift offering only makes for a more compelling product.
With a large variety of workouts and training plans available, most riders will be able to find something here that works for them. And if not, the ability to create custom workouts quickly and easily will prove very useful.
The addition of a subscription fee is likely to give pause to some would-be users, but for riders that spend lots of time on the indoor trainer, the investment is likely to a worthwhile one.
This article was originally published on cyclingtips.com